Dilly Beans
- Yield: Makes 4 (1-pint/500 ml) jars
-
- Nutritional Analysis
- Per Serving
- Serving Size
- 1 of 4 servings
- Calories
- 110
- Total Fat
- 1 g
- Saturated Fat
- 0 g
- Carbohydrates
- 18 g
- Dietary Fiber
- 7 g
- Sugar
- 8 g
- Protein
- 5 g
- Cholesterol
- 0 mg
- Sodium
- 891 mg
- Yield: Makes 4 (1-pint/500 ml) jars
-
- Nutritional Analysis
- Per Serving
- Serving Size
- 1 of 4 servings
- Calories
- 110
- Total Fat
- 1 g
- Saturated Fat
- 0 g
- Carbohydrates
- 18 g
- Dietary Fiber
- 7 g
- Sugar
- 8 g
- Protein
- 5 g
- Cholesterol
- 0 mg
- Sodium
- 891 mg
Ingredients
Directions
- Prepare a boiling water bath and 4 regular-mouth 1-pint/500 ml jars according to the process. Place the lids in a small saucepan, cover them with water, and simmer over very low heat. Wash and trim the beans so that they fit in your jars. If you have particularly long beans, your best bet for minimum waste is to cut them in half, although by doing so, you do lose the visual appeal of having all the beans standing at attention.
- Combine the vinegar, 2 1/2 cups/600 ml water, and pickling salt in a pot and bring the brine to a boil.
- Meanwhile, pack the beans into the sterilized jars, leaving 1/2 inch/12 mm head space. Add 1/4 teaspoon cayenne pepper (more if you're a lover of heat), 1 garlic clove, and 1 teaspoon dill seeds to each jar.
- Slowly pour the hot brine over the beans in each jar, leaving 1/2 inch/12 mm head space. Gently tap the jars on a towel-lined counter top to help loosen any bubbles before using a wooden chopstick to dislodge any remaining bubbles. Check the head space again and add more brine if necessary.
- Wipe the rims, apply the lids and rings, and process in a hot water bath for 5 minutes (see process below).
- Let these pickles cure for at least 2 weeks before eating.
- How to Process:
- If you're starting with brand-new jars, remove their lids and rings. If you're using older jars, check the rims to make sure there are no chips or cracks.
- Put the rack into the canning pot and put the jars on top.
- Fill the pot (and jars) with water to cover and bring to a boil. I have found that this is the very easiest way to heat up the jars in preparation for canning because you're going to have to heat up the canning pot anyway. Why not use that energy to heat up the jars as well?
- Put the lids in a small saucepan, cover with water, and bring them to the barest simmer on the back of the stove.
- While the canning pot comes to a boil, prepare your product.
- When your recipe is complete, remove the jars from the canning pot (pouring the water back into the pot as you remove the jars) and set them on a clean towel on the counter. There's no need to invert them; the jars will be so hot that any remaining water will rapidly evaporate. Remove the lids with tongs or a magnetic lid wand and lay them out on the clean towel.
- Carefully fill the jars with your product. Depending on the recipe, you'll need to leave between 1/4 and 1/2 inch/6 mm and 12 mm of headspace (that's the room between the surface of the product and the top of the jar). Jams and jellies typically get 1/4 inch/6 mm, while thicker products and pickles get 1/2 inch/12 mm.
- Wipe the rims of the jar with a clean, damp paper towel or the edge of a clean kitchen towel. If the product you're working with is very sticky, you can dip the edge of the cloth in distilled white vinegar for a bit of a cleaning boost.
- Apply the lids and screw the bands on the jars to hold the lids down during processing. Tighten the bands with the tips of your fingers to ensure that they aren't overly tight. This process is known as "fingertip tight."
- Carefully lower the filled jars into the canning pot. You may need to remove some water as you put the jars in the pot. A heat-resistant measuring cup is the best tool for this job, as it won't transfer heat to your hand.
- Once the pot has returned to a rolling boil, start your timer. The length of the processing time will vary from recipe to recipe.
- When your timer goes off, promptly remove the jars from the water bath. Gently place them back on the towel-lined countertop and let them cool.
- The jar lids should begin to ping soon after they've been removed from the pot. The pinging is the sound of the seals forming; the center of the lids will become concave as the vacuum seal takes hold.
- After the jars have cooled for 24 hours, remove the bands and check the seals. You do this by grasping the jar by the edges of the lid and gently lifting it an inch or two off the countertop. The lid should hold fast.
- Once you've determined that your seals are good, you can store your jars in a cool, dark place (with the rings off, please) for up to a year. Any jars with bad seals can still be used -- just store them in the refrigerator and use within 2 weeks.
Cook’s Note
If you have easy access to dill heads, feel free to substitute them for the dill seed called for in this recipe. I wouldn't, however, recommend using fronds of dill weed, as they can break down during storage and turn the brine murky.
Looking for Something Else?


Fudge Factor


Over-the-Top-Delicious Treats to Satisfy Your Food Obsession
Are you infatuated with ice cream? Do you lust over lobster? Swoon at the sight of chocolate? Here's the best recipe for each food …

Sifted: Plan-Ahead Valentine's Day Desserts Feb 6, 2013
Get our take on the best in food news, recipes and more from around the web, including the best Valentine's Day recipes.

Train Frontman Pat Monahan's Dark Chocolate Obsession Feb 11, 2013
Train frontman Pat Monahan, an avid chocolate lover, shared with us his top five reasons for eating dark chocolate.


Craving: Chocolate Cake Jan 27, 2011

Review: Anthony Bourdain and Eric Ripert's Chocolate Bar Nov 16, 2012
Anthony Bourdain and Eric Ripert have teamed up with master chocolatier Christopher Curtin to create the "Good & Evil" chocolate b …
Hungry Girl's Chocolate 911 Feb 4, 2011

The Craziest Chocolate Creations for American Chocolate Week Mar 17, 2013
It’s officially American Chocolate Week. Check out photos of mind-blowing chocolate creations.

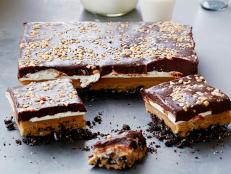
Chocolate Desserts
Indulge in our decadent chocolate desserts, from cookies and cakes to puddings, souffles and truffles.

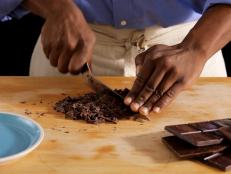
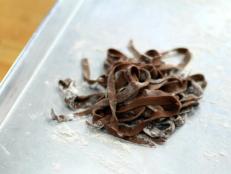
How to Chop and Melt Chocolate
Lots of recipes call for melted chocolate. Follow these step-by-step instructions to do it properly.


Sifted: Birthday Doughnuts, Crepe Cupcakes and Carrot Cake Pancakes Mar 21, 2012

Essentials: Chocolate Basics Sep 1, 2016
Satisfy that chocolate craving in your very own kitchen. All you need is baking chocolate and a little know-how. It also helps to …